Restore without Losing Data - make_noerase_ipsw (No Backup Needed)
09/01/2017
24193
make_noerase_ipsw has just been updated for iOS 10+ firmware. Here’s how you can download it.
What is make_noerase_ipsw?
If you are a long time jailbreaker, coming across situations when you absolutely must restore your device is inevitable. Oftentimes, you don’t have a complete backup of your data. This is exactly where this new utility comes in.
make_noerase_ipsw allows you to restore to the latest signed firmware version without losing your data. It is developed by developer Allen Fox.
Usually, updating to the latest firmware means you will have to relinquish your jailbreak. If your jailbreak is more important than your data, I recommend using Future Restore utility.
This method is not new and has been around since iOS 7 days. The best part about this tool is that you don’t need to have SHSH Blobs.
How does it work?
make_noerase_ipsw executable file modifies the original firmware file in such a manner that it only restores the “system root” partition. It doesn’t tinker around with the /var/ folder that contains all your applications and user data.
This ensures all your applications stay there just like you normally update your iOS firmware with iTunes. The only data that get removed are your jailbreak files (tweaks, themes, etc) and Cydia. Think of it as an OTA update that you initiate and complete manually.
How is make_noerase_ipsw useful?
make_noerase_ipsw tool comes in handy in a lot of different situations. It’s best used when Apple is signing the current jailbreak-able version. Here’s when you can use it.
Here’s when you can use it.
iPhone, iPad, or iPod stuck in Recovery mode or DFU mode.
Device stuck in a bootloop
RSOD (Red Screen of Death)
Soft-bricked devices
Here are some cases where this tool will fail.
Unlocking locked devices.
Hard-bricked devices
Hardware problems
All in all, it covers pretty much all software-related issues and errors.
Download make_noerase_ipsw
Github (official)
Requirements
iPhone, iPad, and iPod touch
iOS 10 firmware or below
A computer running Windows (macOS/Linux are incompatible)
USB cable
IPSW file of the latest firmware version
How to use make_noerase_ipsw?
Step 1 Open any web browser on your computer and go to this URL – ipsw.me.
Step 2 Download the latest iOS firmware version for your device. Also, make sure your hard disk has enough space left.
Step 3 You should now have these two files as shown below. To make the process easier, simply search your Downloads folder for “ipsw”.

Step 4 Now drag the .ipsw file over to the .exe file.
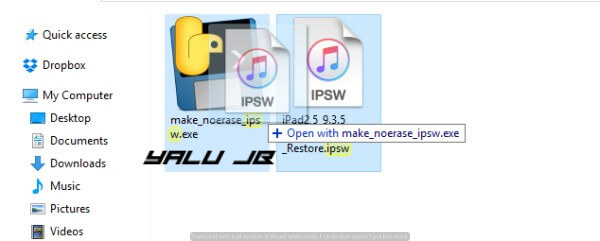
Step 5 Windows will now display a security prompt asking you to run this file. Press the Run option.
Step 6 The .exe file will now automatically launch a Command Prompt window. Be patient and wait for it to unpack the IPSW file.
Step 7 After a while, it will display “Press Enter to exit”. Simply press the enter/return key.
Step 8 Go back to the folder where you downloaded the IPSW file in step 1. The new “erase firmware file” starting with “UPG” will be present in the same folder.
Step 9 Put your device in Recovery mode and connect it to your PC. using a USB cable. Here’s how you can put your device in Recovery mode.
Press and hold the Sleep + Home button on iPhone 6s or older devices.
Press and hold the Volume Down + Home button for iPhone 7 and iPhone 7 plus.
Step 10 Launch iTunes.
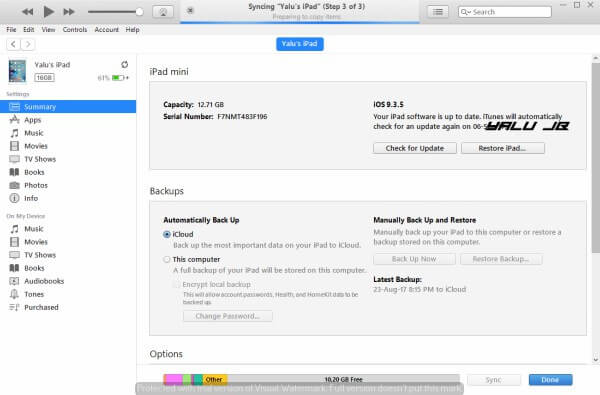
Step 11 Hold Shift, click Restore and select the modified .ipsw file we created with make_noerase_ipsw.
Step 12 Sit back and wait for iTunes to complete the process. When the process is complete, your device will be unjailbroken with all your apps and data still intact.

